
https://tomcat.apache.org/download-90.cgi
Apache Tomcat® - Apache Tomcat 9 Software Downloads
Welcome to the Apache Tomcat® 9.x software download page. This page provides download links for obtaining the latest version of Tomcat 9.0.x software, as well as links to the archives of older releases. Unsure which version you need? Specification version
tomcat.apache.org
https://www.eclipse.org/downloads/packages/release/2022-06/r
2022-06 R | Eclipse Packages
495 MB 589,386 DOWNLOADS Tools for developers working with Java and Web applications, including a Java IDE, tools for JavaScript, TypeScript, JavaServer Pages and Faces, Yaml, Markdown, Web Services, JPA and Data Tools, Maven and Gradle, Git, and more. Cli
www.eclipse.org
- Eclipse IDE for Enterprise Java and Web Developers
윈도우 : 2022.06 Window s86_64 설치
맥 : 2022.06 macos AArch64 설치
- Tomcat 9 설치
윈도우 : Window zip
맥 : tar.gz
맥이 오히려 비교적 간단하게 설치했다.
1) 톰캣 설치후 응용프로그램으로 복붙해서 파일 이동을 시켜준다.
2) 다운받은 이클립스 실행 후 밑에 윈도우와 동일한 작업. 톰캣 설치 후 테스트 실행단계는 스킵했다.
(맥에는 DBeaver로 Oreacle을 연결해서 사용해서 포트번호 충돌이 일어나지않았음. 그래서 변경없이 바로 진행)
3) 바로 밑에 윈도우 3,4,6,7번 순서대로 실행하면 잘 작동한다
윈도우 :
1) 프로그램 설치 후 Tomcat9로 파일 이름 변경 후 C드라이브에 저장
2) 명령프롬포트 관리자권한에서 톰캣이 잘 실행되는지 확인
cd.. - cd.. - cd Tomcat9 - cd bin - startup.bat - shutdown.bat 후 종료
3) 설치된 이클립스 Window - preferences 에서 UTF-8로 변경(General - workspace,contentType / Web - html, css, jsp)
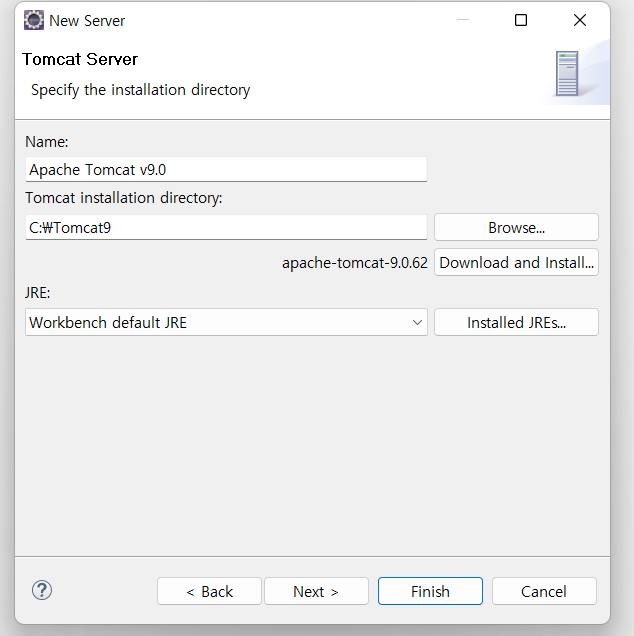
4) 이클립스 화면 하단 Server 에서 C드라이브에 있는 톰캣 위치 연동 후 Finish

오라클이 설치되어있다면
연동 후 재생버튼(Restart the server)을 클릭시 오라클 8080 포트번호가 충돌해서 에러가 날 수 있음
-> 포트번호를 9090으로 변경해준다.

5) cmd에서 slqplus - system계정 접속 - EXEC DBMS_XDB.SetHttpPort(9090); - SELECT DBMS_XDB.GetHttpPort() FROM DUAL;
9090 변경완료 확인 후 다시 이클립스 재생클릭(Restart the server)

6) 테스트용 프로젝트 파일,생성 File - new - Dynamic web - Project / src - webapp - HTML File

7) <body>안에 아무 텍스트나 입력 후 톰캣 연결 확인
<body> 테스트 </body> - Ctrl+F11
웹사이트 안에 테스트문구가 입력되어 창이 뜬다면 성공 :)
'===========' 카테고리의 다른 글
| 맥 이클립스 DBeaver 오라클 연동 (0) | 2023.02.11 |
|---|---|
| 맥북M1 Docker로 (Oracle,DBeaver) 데이터베이스 연동 계정추가 (0) | 2023.02.09 |